
I still remember the first time I pulled a beefsteak tomato off the vine and flipped it over. The bottom was a leathery black crater. I thought it was a disease. Turned out, blossom end rot causes are almost never about disease—they're about how the plant moves calcium. Or rather, how it fails to.
Here's the blunt truth most garden blogs skip: adding calcium to your soil rarely fixes it. I've tested this in my own raised beds and watched a master gardener friend do the same on her farm. The rot kept showing up even when soil tests said calcium was plenty. So what's really happening? Let's dig into the actual blossom end rot causes—the ones that matter.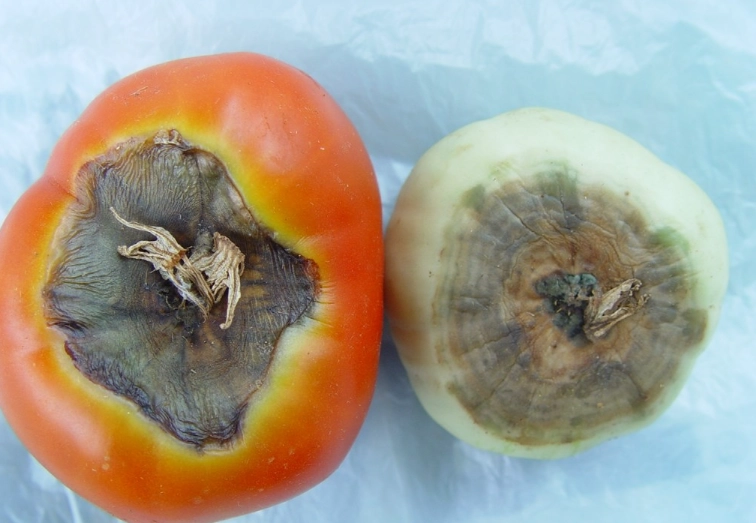
Quick Jump: What I'll Cover
What Is Blossom End Rot, Really?
Blossom end rot (BER) starts as a small water-soaked spot at the blossom end of the fruit—the bottom, opposite the stem. That spot darkens, turns leathery, and sometimes gets a fuzzy gray mold secondary infection. It hits tomatoes hardest, but peppers, eggplant, and even some squash can get it.
What most people miss: the rot is a symptom, not the problem. The fruit tissue is collapsing because calcium didn't arrive in time to stabilize cell walls during rapid growth. And here's the counterintuitive part—your soil can be loaded with calcium and the plant still starves for it. That's the core of blossom end rot causes. It's a delivery problem, not a supply problem.
The Calcium Transport Trap
Calcium moves through the plant almost entirely with water flow in the xylem. It doesn't get re-routed from old leaves to new fruit like nitrogen or potassium can. So if water flow to the developing fruit stalls—even for a day or two—calcium delivery stalls with it.
Why Soil Calcium Tests Can Fool You
I once had a soil test show 2,800 lbs/acre of calcium. Plenty. Yet my first truss of Roma tomatoes rotted. The problem? A stretch of cool, cloudy weather followed by a sudden heat spike. The plant's water uptake went haywire, and those rapidly swelling fruits got starved of calcium at the critical moment.
A common myth says you need to add gypsum or crushed eggshells. Unless your soil is genuinely deficient (rare in most vegetable gardens), that's wasted effort. The real fix is managing water and root health.
Watering Swings: The Hidden Culprit
If I had to pick the number one cause among the blossom end rot causes list, it's inconsistent watering. Not too much or too little—the swing between the two. Tomatoes hate drama in the soil moisture department.
Here's what happens: you go on vacation, the soil dries out, the plant stops transpiring efficiently. Then you come back and flood the bed. The plant surges, pushes water and growth, but calcium movement lags behind fruit expansion. The fruit's bottom cells collapse. Rot appears.
My Personal Watering Test
I stuck a cheap moisture meter in three spots of my raised bed. The readings varied by 30% across a 4-foot section. That told me my drip line wasn't delivering evenly. Fixing that alone reduced rot on my Sweet 100s. Mulch helped too—3 inches of straw kept the moisture curve flat.
Soil and Root Issues That Sabotage Calcium
Water is the vehicle, but the roots are the engine. Anything that damages roots or limits their reach will trigger BER, even if water and calcium are available.
Compacted soil is a big one. I dug into a friend's garden bed and found a 4-inch hardpan just below the surface. Roots were growing sideways, not down. No deep roots, no reliable calcium delivery during dry spells.
Root knot nematodes are another sneaky cause. The galls on roots block water uptake. If your plants wilt in the afternoon even when soil is moist, pull one up and check the roots. I found nematode damage in a sandy patch of my garden two seasons ago—that explained the BER on peppers in that exact spot.
Cold soil early in the season slows root activity and calcium uptake. Planting too early is a rookie move that costs you the first truss. Wait until soil is consistently above 65°F (18°C) at 4 inches deep.
| Cause | What You'll Notice | Quick Fix |
|---|---|---|
| Inconsistent watering | Rot appears after dry spell then heavy rain | Mulch heavily, drip irrigation on timer |
| Compacted soil | Roots grow sideways, plants wilt in afternoon | Broadfork or deep till once, add organic matter |
| Cold soil at planting | First fruits rot, later ones fine | Wait for 65°F soil, use black plastic mulch |
| Root damage (nematodes, cultivation) | Stunted plants, galls on roots | Rotate crops, plant resistant varieties, avoid deep hoeing |
| Excess nitrogen | Huge leafy plants, few fruits, rot on first fruits | Stop nitrogen fertilizer, add phosphorus and potassium |
How to Fix Blossom End Rot (Step-by-Step)
Forget the calcium sprays. They're mostly useless because the calcium can't penetrate the fruit skin effectively. Here's what actually works, based on my trial-and-error:
Step 1: Remove all affected fruits immediately. They won't recover and they drain the plant's resources.
Step 2: Check soil moisture at 6 inches depth every morning for a week. If it swings from soggy to dry, fix your watering. I use a simple tensiometer now—cost me $30 and saved a whole crop.
Step 3: Apply 2–3 inches of organic mulch (straw, shredded leaves, or pine bark). This is the single best buffer against moisture swings.
Step 4: Stop fertilizing with high-nitrogen products. Nitrogen pushes leafy growth and can lock out calcium uptake. Switch to a low-nitrogen, calcium-rich foliar feed only if you've confirmed soil deficiency through a lab test.
Step 5: If you suspect root damage, dig up one plant. Look for galls or brown mushy roots. If nematodes are present, solarize the soil next season or switch to container growing for a year.
Straight Answers to Real Questions
I've been down this road enough times to know that blossom end rot causes are rarely about what you need to add—they're about what you need to stop disrupting. Focus on water consistency, root health, and realistic expectations. That's how I went from losing half my crop to barely noticing it.
All observations in this article come from my own garden trials and conversations with extension agents at land-grant universities. No affiliate links, no fluff.
Leave a Comment