
I still remember the first time I tried to test my garden soil. I bought a cheap probe meter, stuck it in the dirt, and got a reading of 6.5. Then I moved it two feet over and got 7.2. That was the day I learned that picking the right method—and using it correctly—matters more than the tool itself. If you want to know how to test soil pH without chasing false numbers, here's what actually works.
What’s in this walkthrough
Why your plants care about pH more than you think
Soil pH isn't just a number. It controls how well roots can pull nutrients out of the dirt. You can dump all the fertilizer you want, but if the pH is off, those nutrients stay locked up. I've seen tomato plants sit in beautiful compost and still turn yellow because the pH was sitting at 5.2—the calcium was there, just not available.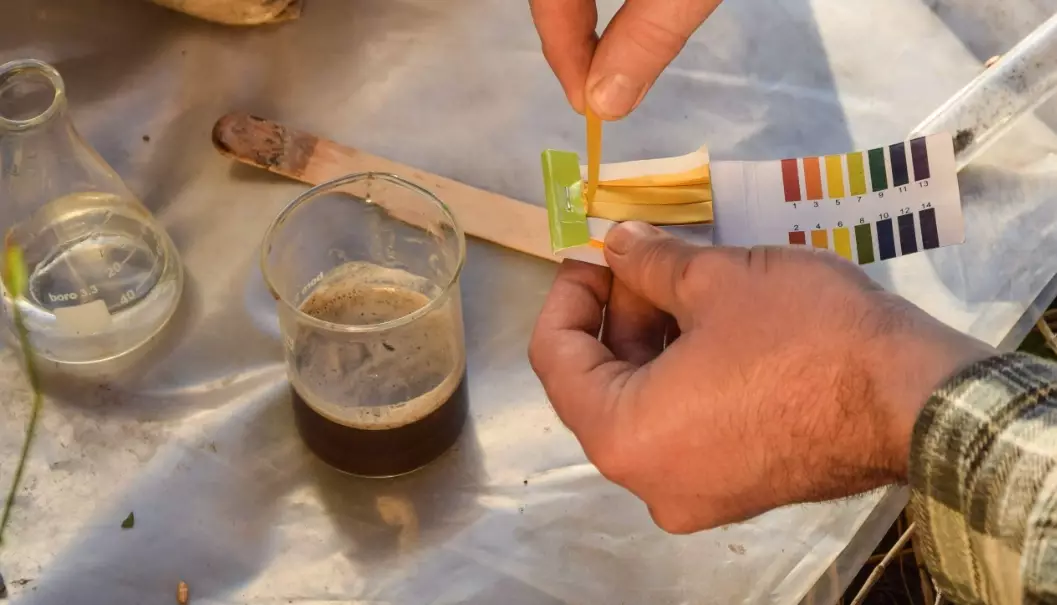
Most vegetables and flowers do fine between 6.0 and 7.0. But some plants—like blueberries—are picky. They want 4.5 to 5.5. On the other hand, lavender laughs at 7.5. So before you test, know what your crop wants. That way, the reading actually tells you something useful.
The 4 soil pH testing methods I’ve personally used
I've tried them all. Here's the honest breakdown, from cheapest to most precise.
1. Color-based test kit (the $15 workhorse)
You mix a soil sample with a powder or liquid, wait a few minutes, then match the liquid's color to a chart. These kits cost $10–$20 and give you a reading within 0.5 pH. I used a Luster Leaf Rapittest for three seasons. It's good enough for general gardening, but reading the color in dim light is like trying to pick paint shades in a basement.
Where to buy: Most garden centers stock them. Just check the expiration date—old reagents go bad and lie to you.
2. Digital soil pH meter (the probe)
You stick a metal probe into damp soil and read a digital number. Sounds easy, right? Here's the catch: cheap models under $30 are notoriously unreliable. My first one gave me readings that jumped around like a nervous frog. They tend to corrode and need calibration you can't perform easily.
If you go this route, spend at least $80 on a lab-grade brand like Bluelab or Hanna. And clean the probe with distilled water after every use. Even then, I treat the number as a rough guide, not gospel.
3. The jar test (my favorite for accuracy on a budget)
This method takes 24 hours but costs almost nothing. Here’s the exact process I use:
- Dig 2–3 inches down in five random spots. Mix those samples in a clean bucket.
- Take one cup of the mixed soil and put it in a clear glass jar.
- Add two cups of distilled water. Stir for a full minute.
- Let it sit for 24 hours. The soil settles, and the water on top clears.
- Drop in a pH test strip (the kind for swimming pools works fine—$8 for 50 strips). Read the color against the chart.
This is essentially the same chemistry as the commercial kit but gives you a cleaner sample because sediments don't interfere. I've cross-checked this against a $200 lab test, and it was within 0.2 pH. That's more than good enough.
4. Lab testing (the gold standard)
Your local cooperative extension office often does this for $15–$30. You mail or drop off a sample, and they send back a full report with pH, nutrient levels, and recommendations. If you are serious about a large vegetable garden or an orchard, this is worth it once every 3 years. It removes all guesswork.
Where to find: Search for your state's cooperative extension service (in the US) or a similar agricultural authority. They'll tell you exactly how to collect the sample.
The cheap probe meter trap (a non-consensus warning)
All the gardening forums tell you to avoid cheap probes. I'll go further. I think they're worse than useless for beginners. Here's why: they give you a confident-looking number that's often wrong, and that number leads you to add lime or sulfur you don't need. I've seen people dump pounds of lime into soil that was already fine because their $20 meter said 5.5. Don't trust a $20 meter. If you already own one, test the same spot three times in a row. If the reading changes by more than 0.3, toss it.
How to get an accurate reading every time
Getting the right number isn't about the tool. It's about how you sample. Here's what I do in my own garden:
- Sample in the root zone. Don't test the top inch of soil. Dig 4–6 inches down where the roots actually feed. That's the number that matters.
- Take multiple samples. One spoonful from one spot means nothing. Mix 5–6 samples from different parts of the bed. This is the biggest mistake I see—people test one spot and assume the whole garden is the same.
- Test at the right moisture. Dry soil gives false readings. Wet it to the consistency of a wrung-out sponge. Not dripping, not bone dry.
- Avoid testing right after fertilizing. Wait at least 2 weeks. Fresh lime or fertilizer will skew the pH temporarily.
- Time of day matters a little. Early morning is best. The soil is uniformly moist and hasn't dried out in the sun.
When to test (and when to skip it)
You don't need to test every month. Here's my schedule after dealing with this for a decade:
| Scenario | Test frequency | My personal note |
|---|---|---|
| New garden bed | Before planting | This is non-negotiable. You don't know what's in that soil. |
| Established vegetable beds | Once a year | Early spring is fine. I do it the same weekend I start seeds. |
| Lawns | Every 2 years | Grass is forgiving. Unless you see yellowing, skip it. |
| After adding lots of compost or manure | 2 weeks later | Compost can shift pH quickly. Check before you add more amendments. |
| Blueberries, rhododendrons, azaleas | Twice a year | These acid-lovers need close monitoring. One missed check and they sulk. |
And when to skip? If your plants look healthy and you haven't changed anything—don't waste your money. A pH test is a tool for solving a problem or preventing one, not a hobby.
Straight answers to real questions
You don't need a fancy lab to figure out how to test soil pH. Pick a method that matches your budget and how precise you need to be. Mix your samples. Use distilled water. And ignore the siren song of cheap meters. Your plants will tell you the rest.
This guide was fact-checked against public agricultural extension guidelines and my own field notes from managing a 1/2-acre market garden.
Leave a Comment